 Let's not pretend I'm a master seamstress... because I'm not. Let's get that out of the way up front. It's called seam & stress for a reason. I'm just Heather, the author of Miscellaneous, etc. A new snazzy little blog designed to help me make sense of life's randomness & become a better person. Thanks for this opportunity Beck!
So yes, I like cute things, but I'm also frugal. {That's a kinder synonym for cheap, don't you think?} So when I realized the fun, color shower curtain I was trying to find for my kids' bathroom {that wasn't red, yellow or blue with tropical fish} was no where to be found, I figured... "How hard could that be to make?"
Well it turns out... not that hard!
Firstly I tried to find tutorials online & learned I may possibly have ADHD. I couldn't sort through all of those tutorials & most of them might as well have been written in Arabic.
So I'm gonna dumb it down because that's all I know how to do. So this is the simple version, because that's how we roll over at Miscellaneous, etc. {check me out}. But if you want to get fancy... best of luck to ya.
Ready?
Find some fabulous fabric you adore. That shouldn't be too hard with all the darling prints & options out there. Especially online. I found mine from fabric.com, the Amy Butler line. It's a little pricey, but that's what I wanted gosh darn it. {FYI: Please turn down the volume on your computer when visiting this site because a creepy little woman walked onto the right side of the screen & frightened me so severely I screamed. Just warning you.}
Sorry... back to the task at hand. You will need:
- 5 yards of your desired fabric (measuring 54" in width)
- shower liner
- matching thread
- scissors
- 12 shower rings
- grommet kit (optional)
- iron & water spray bottle
1) Wash Your Fabric
Before you begin, it is imperative that you wash the fabric first. This allows for shrinkage. I have found that a poly-cotton blend fabric is best because it needs little ironing. {What's an iron?}
2) Measure Opening
A standard shower curtain measures 72"X72". For the finished curtain width, measure the length of your curtain rod to be sure it does not exceed this measurement. For the finished curtain length, measure form the rod to approximately half way down the sides of the tub. {Feel free to skip this step & mosey on over to step #3 if you have cocked your head to the side with confusion.}
3) Cut Each Panel
Since your fabric is 54” wide, you will need two panels of fabric to create the width of your shower curtain. Cut two panels of 88” length each (72” finished length + 8” for each hem). Split one panel directly in half - one for each side of the center panel.
4) Pin & Sew Panels
Pin right sides of each half of the split panel to the right side edges of the full-sized panel. {Oh yeah, you need pins.} If your fabric has a pattern, make sure that the patterns line up on the panels. {I didn't worry about this because it is bunched up anyway. BUT... if you want it to match up (OCD girls - you know who you are), some of your fabric will be wasted.} Stitch the three panels together. Finish the seams by zigzagging the hems - you don’t want them to unravel in the wash.
4) Cut & Hem Curtain to Size
The next step is to cut your panel to size. The width should be cut to 80” (72” finished + 4” for seam allowances on each side). The length should be cut to 88” (72” length + 8” on each end for seam allowances). The easiest way to make straight angles is to use a t-square, which is available at your local fabric store.
On each end (lengthwise), measure eight inches for the seam and iron it into a crease. Fold four inches back to meet the crease and iron that crease as well. You are creating a finished double thick hem that is four inches wide. Repeat this procedure on the sides of the curtain, except with a four-inch starting hem and a two-inch doubled, finished hem. Stitch all four hems. {To be perfectly honest I eyeballed it. Whoopsy daisy.}

To accommodate the 12 decorative rings, you will need to make 12 buttonholes or apply 12 metal grommets. Using a water soluble fabric pen {or a pencil for pity sake}, mark the location of each opening. Each mark on the right side of the curtain should measure 1" from the finished top edge of the curtain. The first and last mark should measure 3" from the finished side edge of the curtain (within the side and top hems) and the remaining 10 openings should measure 6" between each. Follow the instructions in your grommet kit, or make button holes or make a little sleeve for your rod to slide through... whatever you fancy.
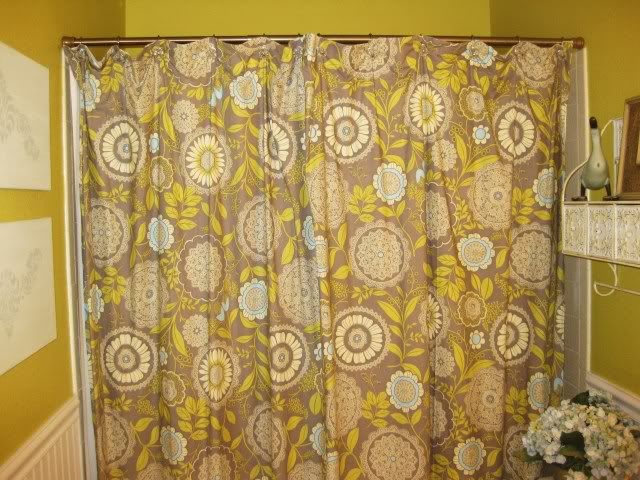
Final product!
 It took me & some girlfriends about 2 hours from start to finish. Not too shabby for an inexperienced shower curtain maker. :) Hopefully this was helpful. Best of luck!
Thanks Becky. And please... you are all welcome to come on over to Miscellaneous anytime. Especially since there is a darling giveaway today! Hop on over to check it out! You may be the winner!
Oooh...I love the fabric you chose. It looks great! I am definitely going to have to try this and modify it for a clawfoot tub!
ReplyDeleteThat fabric you used is so cute! Great job!
ReplyDeleteThanks for the inspiration... I moved recently and have been really annoyed with our bathroom. This and a fresh coat of paint may be all I need!
ReplyDeleteI LOVE LOVE that fabric, that's such a cute idea...the last time I bought a shower curtain, I had the hardest time finding one I liked and even then it wasn't that cute. LOVE IT!!
ReplyDeleteLove the color on your walls.
ReplyDeleteGreat job with the shower curtain.