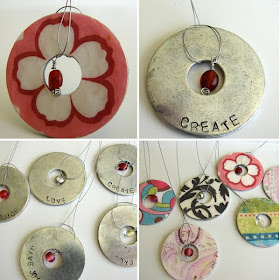
 My mom, sister, and I have been on a washer necklace making kick lately.
Here's what you do:
Phase 1 Supplies:
Stamps
Hammer
Washer (we use fender washers)
Hard surface
Hair Spray
Magic Marker
Scissors
Scrapbook paper
 You can buy the metal stamps from Harbor Freight Tools for about $5 (here's a 20% off coupon if you are interested).
Once you have decided on a saying or word for your washer, hold on tight to the stamp and give it one firm and quick swing with the hammer. The wood actually wasn't hard enough and we ended up moving to the tile floor. Concrete would also work. Once you have the washer punched, color the entire surface with a black magic marker. After the marker has dried, spray with hair spray and wipe off. This will turn the letters black and help them show up.
Then trace the washer onto the paper and cut out.
 Phase 2 Supplies:
Sand paper
Glue
Mod Podge
Cover the washer with glue and then set the paper on top. Most likely your cutout will be larger than the actual washer--this is okay. Glue the paper on and wait for it to dry. Once it is dry take your piece of sand paper and smooth off the edges. This will take care of any excess paper and give it a nice finished edge.
Cover with Mod Podge, dry, and repeat as many times as you would like. I like put on think coats of Mod Podge so it gives a bubble or glass look to it. Just make sure you let each layer dry before adding more.
 Phase 3 Supplies:
Wire
Beads
Pliers
Closures
Cut the wire to the desired length, add the closures to the ends. Add a bead if, you so chose, to a little piece of wire twisted at the ends.
Fold wire in half, slip through the bead and then through the hole in the washer, and back between both strands to finish it off.
And because you already have everything out, you might as well make a few!
Yay! I just started making some!
ReplyDeleteNikkala, I think this would be a good thing for our workshop enrichment. Got a cost estimate? Interested in teaching it?
ReplyDeleteWhat size stamps do you use? I definitely want to make some.
ReplyDeleteOH MY HECK, sooo adorable! I am excited to make some. I just found your site and I love it!!! I have to tell all of my family about it. You have the cutest crafts. I just went through all of your posts and i am so excited to cuten up my home! thanks!!!
ReplyDeleteThese are amazing. Thank you so much for sharing. Something fun for my sisters and I to do together! Thanks again.
ReplyDeleteRiki Lee - My stamps are 1/8". Have fun!
ReplyDeletewhat a great idea!!!
ReplyDeleteNikkala-you clever cat-I love them! Why can't you move and be my neighbor!!
ReplyDeleteAww, how pretty! I like the idea of teaching this to a group, it would be perfect! Thanks so much, I'll be linking to this.
ReplyDeleteVery cute! Those are awesome! Love how you have it divided into phases :D
ReplyDeleteSo fun!
ReplyDeleteThese would make great gifts! I'm excited to make some!
ReplyDeleteSo cute! I am definately making these little numbers-so fun!
ReplyDeleteThis is awesome!!! I definitely want to try this soon. :)
ReplyDeleteYour washers are adorable. I love these necklaces and I like the variations you have made with the metal stamping and the wire for the "string." I am featuring this on somedaycrafts.blogspot.com Grab my "featured" button and come back often!
ReplyDeletewhat type of stamps are these and where can they be purchased?
ReplyDeleteWhat size are the stamps? Where can you get them besides the one location you mentioned? What size are the washers? I LOVE this idea!
ReplyDeleteWhat size washers? What kind of wire and closures did you use? How do you fasten the closures? I don't understand how you did the bead, can you explain to me? (I'm new to jewelry making obviously..)
ReplyDeleteI want to do this for my neighborhood craft group early Oct. but have to figure it out myself first of course. Please help!
LOVE these! great idea for my girls to make! how do you keep the necklace on? do you ahve to put a clasp on the end?
ReplyDeleteThis would be an AWESOME girls's camp activity!
ReplyDelete